Interfacing with Amazon AWS IOT Core
Firstly, we are not associated with Amazon in any way. We have written this tutorial to explain how to interface our sensors with the Amazon's AWS IoT Core.
AWS IoT Core is a fully managed service designed specifically to allow you to publish telemetry data in a very secure manner to AWS so that the data can be used by downstream services like DynamoDB, Lambda, SNS, SQS, Amazon Kinesis, MQTT, Amazon S3 Bucket, Amazon Kinesis Firehose, CloudWatch, Amazon Elasticserch Service, Salesforce IoT, and Amazon IoT Analytics.
In this tutorial we will provide you with step-by-step instructions to connect our RF sensors with AWS IoT Core, and Amazon CloudWatch (used to graph temperature data).
Install AWS IoT GDK on Raspberry Pi.
In this tutorial we will install AWS IoT SDK on the same Raspberry Pi where you have installed a wireless base station.
Make sure you have the full version of Raspberry Pi Raspbian distro installed (not the light version), because we will be using JavaScript (which is not installed on the light version).
We have sample apps developed in JavaScript and Python. You can find installation instructions for Amazon's IoT SDK's here. Otherwise below we provide abbreviated installation instructions.
Open up a terminal session on the Raspberry Pi and enter the following commands:
Install the JavaScript IoT SDK as follows:
git clone https://github.com/aws/aws-iot-device-sdk-js.git
cd aws-iot-device-sdk-js
npm install
Install the Python IoT SDK as follows:
git clone https://github.com/aws/aws-iot-device-sdk-python.git
cd aws-iot-device-sdk-python
python setup.py install
AWS IoT Core Background - How it works
The Internet Of Things (IoT) consists of many "things" than can be connected to the internet and are able to send and/or receive data over the internet. A "thing" can be a RaspberryPi, or a thing can be a sensor connected to the RaspberryPi, or any microprocessor capable of connecting to the internet. As you can imagine, security is a major issue with IoT so much of the setup and configuration on AWS IoT is security related. Certificates are created that must be loaded on your "thing" so that it can authenticate with Amazon AWS. You manage the permissions (i.e. what your thing can and can't do on AWS IoT) using a Policy which is attached to the certificate. Sounds complicated but it is fairly straight forward to configure. Amazon store the latest telemetry from your Thing in a "Shadow". Read more about the Amazon IoT Core here.
These are the steps:
-
Create a Thing
-
Create certificates and save them to a safe location
-
Create a policy
-
Attach the policy to the certificate
-
Attach the certificate to the Thing
Set up a Thing on AWS IoT Core
You will need to create a Amazon AWS account, or if you already have one log into your console (https://aws.amazon.com/console/).
Click on the "Services" menu at the top and look for "IoT Core" which is a subset of the Internet Of Things service group. Now we will follow the above 5 steps to create a Thing.
1. Create a Thing
Click on the "Manage" menu item on the left hand side menu, and then "Create a single thing". Give your thing a name (we will use RaspberryPi in this example). You can skip over Thing Types, Groups and Attributes as you can input those later if you need them. Click "Next" and then "Create thing without certificate".
2. Create certificates and save them to a safe location
Click on "Secure" menu item on the left hand side menu, and then "Certificates". Click the "Create" button on the top right and then click the "Create certificate" button. Download each certificate by clicking the download button and store them in a safe place. There is also an option to download the root CA file. Download that file too (tip - I had to right click the link and use the 'save link as' option otherwise it displayed the contents of the file instead of downloading it). Click the "Activate" button and then click "Done"
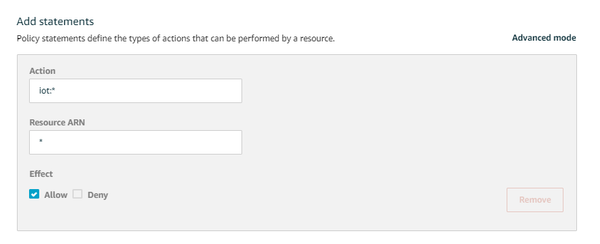
3. Create a policy
Click on "Secure" menu item on the left hand side menu, and then "Policies". Click the "Create" button on the top right and then give the policy a name. Give the policy a name. For now grant all access by typing iot:* in the Action field, and * in the Resource ARN field. You can come back later and refine the permissions, if required. Click on the "Allow" check box and then the "Create" button.
4. Attach the policy to the certificate
Click on "Secure" menu item on the left hand side menu, and then "Certificates". Click on the "..." on the certificate and then "Attach a policy" . Select the check box next to your policy and then click "Attach".
5. Attach the certificate to the Thing
Click on "Secure" menu item on the left hand side menu, and then "Certificates". Click on the "..." on the certificate and then "Attach a thing" . Select the check box next to your Thing and then click "Attach".
Now you are ready to connect your Raspberry Pi to AWS!
Interfacing RF Sensors with AWS IoT Core.
Our AWS IoT Core interface examples can be found at:
What you will need:
- Any model Raspberry Pi with preferably the full Raspbian distro
- Wireless Base Station for Raspberry Pi or Flex RF Module
- Any wireless sensor
What you need to know beforehand:
- How to operate a Raspberry Pi
- You have already set up your wireless base station and tested your sensor
- Some Python programming knowledge is preferable but not mandatory as we provide you with the source code
Open up a terminal session on your Raspberry Pi and download the JemRF Amazon IoT library from github:
git clone https://github.com/JemRF/aws
cd aws
Type dir to see the contents of the directory. You should see three files:
pi@raspberrypi:~/aws $ dir
README.md rf2awsiot.js rf2awsiot.py
The two sample files named rf2awsiot both perform the same function except one is written in JavaScript and the other in Python. You can choose either depending on your prferance for Python or JavaScript. We will describe how to use both.
If you plan on using the JavaScript sample then we will be using the SerialPort library (not needed for the Python version). Install it by typing:
npm install serialport
Copy the certificates to the RaspberryPi.
Copy the Private Key, Root CA and Certificate files over to the Raspberry Pi. These are needed so your Raspberry Pi can connect to AWS.
Configure the Python sample.
The sample is based on the basicshadow sample from Amazon. All configuration is done through passing parameters to the application.
Usage:
rf2awsiot.py [-h] -e HOST -r ROOTCAPATH [-c CERTIFICATEPATH]
[-k PRIVATEKEYPATH] [-n THINGNAME]
Where:
HOST = Your REST API End Point (select the "Interact" menu of your Thing to find this)
ROOTCAPATH = the absolute path to your Root CA file
CERTIFICATEPATH = the absolute path to your Certificate file
PRIVATEKEYPATH = the absolute path to your Private Key file
THINGNAME = the name you gave to your Thing
Example:
python rf2awsiot.py -e a1jjw34fr4fhhbq.iot.us-west-2.amazonaws.com -r /home/pi/aws-keys/root-CA.crt -c /home/pi/aws-keys/certificate.pem.crt -k /home/pi/aws-keys/private.pem.key -n RaspberryPi
Configure the JavaScript example
The configuration is set by editing the file. Use an editor to edit the file and input the configuration items shown in green below:
const thingName = "RaspberryPi";
const endPoint = 'a1j34fr34frhhbq.iot.us-west-2.amazonaws.com';
keyPath: '/home/pi/aws-keys/private.pem.key',
certPath: '/home/pi/aws-keys/certificate.pem.crt',
caPath: '/home/pi/aws-keys/root-CA.crt',
Where:
endPoint = Your REST API End Point (select the "Interact" menu of your Thing to find this)
caPath = the absolute path to your Root CA file
certPath = the absolute path to your Certificate file
keyPath = the absolute path to your Private Key file
thingName = the name you gave to your Thing
Execute the script:
node rf2awsiot.js
Viewing the Device Shadow
Once you have the application up and running you can view the latest telemetry data being sent by viewing your Thing's shadow. From the AWS IoT menu select "Manage", then select "Things", click on your Thing, then select the "Shadow" menu item. In the window called "Shadow State:" you should see the JSON representation of the wireless sensors sending data to AWS, as shown below.
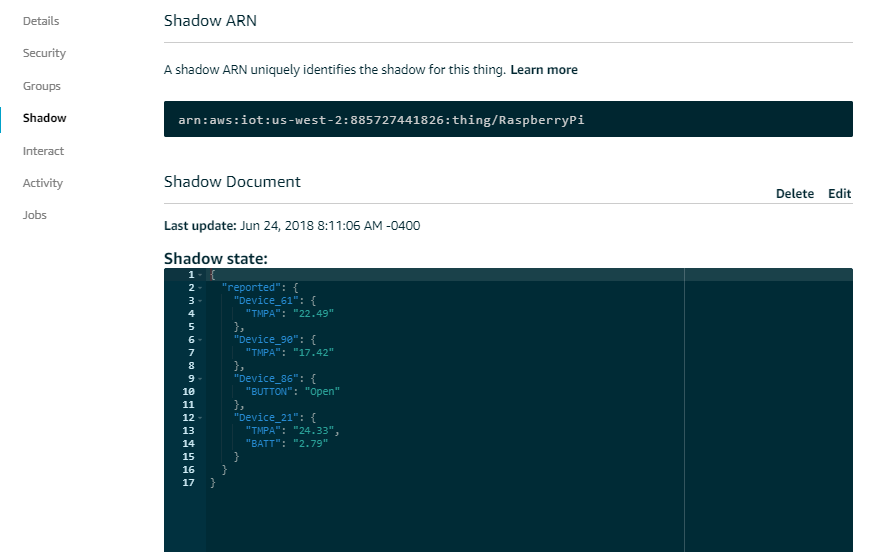
In the example above you can see the Shadow document for my RaspberryPi Thing and 4 wireless sensors with their respective telemetry data. Three of the sensors are sending temperature readings (TMPA) and one sensor is a button switch sensor showing the current state of the switch (Open). Device_21 has transmitted a battery level of 2.79V.
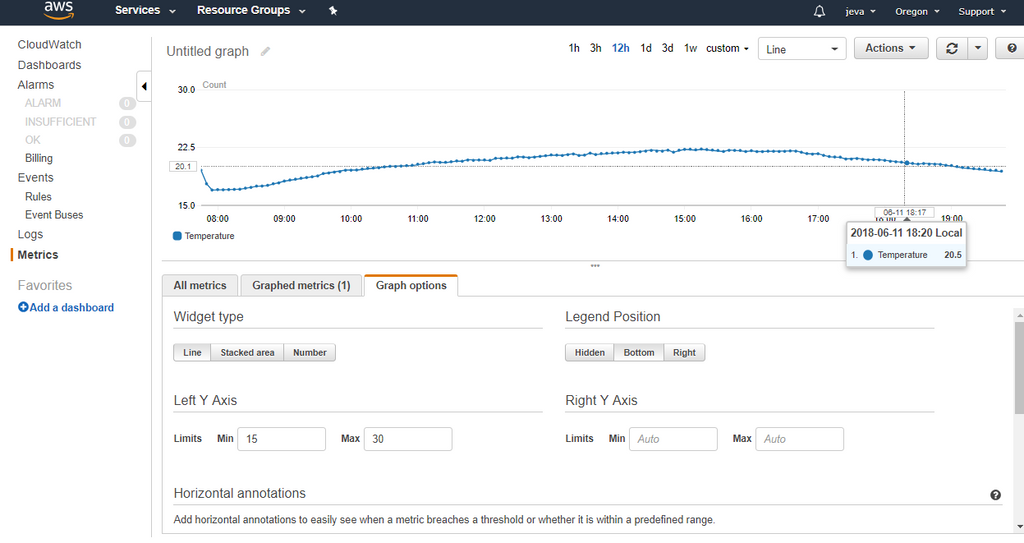
Data Visualization using CloudWatch
Now that you have your data being logged to AWS IoT you can send your data to Amazon's many downstream services. In this section we will show you how to configure CloudWatch to display a historical graph of temperature data.
From the AWS IoT menu click on the menu item "Act", then click on the "Create" button. Give your rule a name enter the following values:
Attribute: *
Topic Filter: $aws/things/Decvice_XX/shadow/update/accepted (where XX is the device ID the wireless temperature sensor)
Then click on the "Add Action" button under the "Set one or more actions" section.

Click on the "Send message data to CloudWatch" radio button and then click "Configure Action" button.
Now enter the following values:
Metric Name: Temperature
Metric namespace: Sensor
Unit: C
Value: ${state.reported.Device_XX.TMPA} (where XX is the device ID the wireless temperature sensor)

Click on "Create a new role", give it a name and then click on "Create a new role" button, then "Update Role", then select the new role from the list.

Lastly click on the "Add Action" button and then "Create Rule" button.
Now your data will get passed to the CloudWatch service.
Open up Cloud Watch from the AWS Service menu and click on the Browse Metric button. There are many configuration for the graph as shown below.